Monday, January 9, 2023

$40,000 CALHFA CALIFORNIA ADU GRANT PROGRAM A COMPREHENSIVE GUIDE


Whether it’s a granny flat, in-law suite, or cottage, all are common names for ADUs, all with the advantage of extra living space that’s sure to be the envy of every neighbor. A desirable addition with limitless uses, ADUs have become more popular in recent years. Still, for some people building an ADU can seem out of reach financially.

This is where the CalHFA grant comes in! A grant program creating housing opportunities for families all across the state, it provides funding to mitigate costs, making this project a reality to more and more homeowners. If you’re a California resident looking into building an ADU, or if you want to make an ADU in Culver City, California, for the extra space in your house, stick around and find out how to make the CalHFA California ADU grant program work for you!


WHAT IS AN ADU?

An ADU, or accessory dwelling unit, is a second housing structure that’s built on the same lot as a primary living unit. Generally, they act as a fully functional living space to include a bathroom, kitchen, rooms and the like. ADUs come in many shapes and sizes to fit the lifestyle and needs of all homeowners; There’s something to fit every existing structure!

For example, an ADU can be attached to a ground level structure like most envision when they think of a home addition. They can also be attached above a garage or upper floor. Converting a garage or creating a basement are also ADU options. Finally, you can have a completely detached ADU that offers an entirely separate structure from the original. 


WHAT IS CALHFA?

CalHFA, or the California Housing Finance Agency, offers financing to California residents who fall into a lower income category. They also offer programs to the same demographic to aid in renting homes. CalHFA can also help first time home buyers navigate and secure loans and down payments. 

Among their portfolio are certain grant programs, the $40,000 ADU grant program being one of them. 


WHAT IS THE $40K CALHFA’S ADU GRANT AND WHO QUALIFIES?

The CalHFA ADU grant is best described by CalHFA itself stating, “The ADU Grant provides up to $40,000 towards pre-development and non-recurring closing costs associated with the construction of the ADU. Predevelopment costs include site prep, architectural designs, permits, soil tests, impact fees, property survey, and energy reports.”

This grant program prides itself on $100 million in grants with a $40,000 maximum per family creating the potential for 2,500 ADUs to be financed. While the grant money is usually allocated by the end of the year, CalHFA continues to provide important information about the program making it possible for financiers to prepare grants for the following fiscal year. 

As far as who qualifies, the broad answer is California residents who are classified as low to moderate income households; There are income limits for this grant. Those figures in specific are determined county by county though. For examples, see the low income limits for popular counties below:


For specific low income limits and access to the county search tool, check out the CalHFA’s eligible limits website.


HOW DOES THE CALHFA’S ADU GRANT PROGRAM WORK AND HOW DO I APPLY?

In short, there’s 5 steps to the CalFHA ADU grant program process. The entire process has been streamlined making for a seamless process from start to finish. 

  • Application: Homeowners will want to start by identifying approved lenders and then applying for a construction loan through one of those. They’ll then apply for the CalFHA ADU grant program via their application forms. 
  • Loan Approval: At this point, the homeowner will have to wait on approval of the construction loan from their lender of choice. After receiving approval the lender can then grant prequalification to the homeowner for the $40,000 ADU grant.  
  • Pre-Development: Any pre-development work needed on the project can start at this point, all paid through the construction loan acquired by the selected lender. The lender will now forward any invoices accrued from pre-development to CalHFA along with the original grant application. 
  • Grant Disbursement: When and if CalHFA approves the homeowners grant, the money will then be dispersed to the construction loan account. The amount dispersed from the CalHFA California ADU grant program will lower the total principal owed. 
  • Construction: Finally, it’s time to start the main construction on the ADU funded by the construction loan; The total cost of which was lowered by the ADU grant. 

As far as how it works with regard to the money disbursement, you won’t just receive the funds outright. If you’re approved for the CalFHA ADU grant program, they’ll combine the money with the loan you took out to cover the remainder of the construction costs. For example, if the total cost of your project is $150,000, your loan will pay $110,000 of the project cost with the CalHFA ADU grant taking care of the remaining $40,000.


CALHFA CALIFORNIA ADU GRANT PROGRAM PROS

There’s plenty of advantages to the CalHFA California ADU grant program. Take a look at some of them below when making the decision to apply. 

1. No Repayment: Let’s be honest, the fact that the CalHFA ADU grant program requires no repayment is the best advantage of all. Pre-development costs can come at a hefty price depending on the type of project. The fact that you can put $40,000 of free cash toward this bottom line only gives you more to spend elsewhere. 

2. Increase in Property Value: This grant helps to propel your property into a higher value bracket. More space isn’t all the ADU adds; It offers a unique flex space not found in your average home. Taking advantage of the grant to complete your project means more resale value on the other end. It’s truly a win-win!

3. Reasonable Qualifications: The basic qualifications for this grant are very fair. For instance, you need to be a full time employee and at least 18 years old. You need to be a U.S. citizen and resident in the state of California for at least 3 months prior to submitting an application.
 
4. Borrowing Power: You can go into the grant process knowing that you’re going to be on the winning side of borrowing power. Secondary loans typically grant higher borrowing power so long as your credit score and finances are in order. That power combined with the $40,000 ADU grant means more than enough for project completion. 


CALHFA CALIFORNIA ADU GRANT PROGRAM CONS

Before starting the application process for the CalHFA California ADU grant program, it’s important to consider these drawbacks. 

  • Grant Cap: This particular grant has a cap of $40,000 per household. While that’s no small number, it might not cover the majority of a larger project. Depending on the home owners finances, it may not be an affordable project even with the granny money in hand. 
  • Income Limit: Depending on your financial situation and the county you reside, the CalHFA grant might not be an option for your ADU project. Even the slightest overage on dollar amount can disqualify you from the grant process. 
  • Specified Use: The CalHFA grant can only be used for pre-development purposes such as surveys, permits, site prep and similar construction preparation or on non-recurring closing costs. It will not cover anything outside of these parameters. 
  • Timeline: Since the ADU grants coincide with a construction loan and these loans have to be repaid short term, the repay timeline can be stressful. Likewise, construction on these loans have to be finished on a short timeline.


ADU GRANT VS ADU LOAN

When it comes to the financial aspect of funding your ADU, many people get lost in the weeds with the terminology. Simply put, an ADU grant is money toward your project that does not need to be paid back. An ADU loan on the other hand, needs to be paid back to the lender within the specified timeframe agreed upon in your loan process. 

This seems easy enough but the CalHFA ADU grant leaves some scratching their heads when it states you need a loan too. The reason for the ADU loan is to cover actual construction costs for your project. Remember, the CalHFA grant only applies to pre-development costs incurred by your build. You’ll need a loan to cover the rest. 

While the CalHFA grant is great, it’s best to get pre-approved from a lender for the estimated construction cost before you do anything else. The amount they are willing to loan hinges on your income, credit, and many other factors. See what you can afford by the lender’s standards prior to moving forward. 


WHAT ARE MY LOAN OPTIONS?

There’s several types of loans you can apply for to build your ADU. Here’s a quick rundown of the top choices:

  • Construction Loan: The most common loan surrounding this topic is a construction loan. These loans usually come with a fixed interest rate, total customization in the building process, a lower monthly payment and other notable benefits. Unfortunately, they do require a larger down payment and you will have to refinance once construction is complete. 
  • HELOCs: A home equity line of credit is another frequently used loan for ADUs and in short, means you’re using your current home’s equity as collateral for the loan. HELOCs allow you to use what you need rather than being loaned a lump sum and they often come with a low APR given that you qualify. You should consider the risk you take in using your home as collateral though, especially when it reduces the equity you’ve built in your home. 
  • Refinancing: Also making use of the home equity you already have, refinancing your current mortgage could help in paying for your ADU. Unlike HELOCs, you’ll acquire a lower rate and have the opportunity for a fixed rate mortgage if you’re coming from an adjusted rate loan. It’s important to remember, monthly payments could be larger depending on what you select. The upfront cost might be too much to handle for some, even though the long term savings are worth considering. 
  • Renovation Loan: The option for renovation loans is great for those with a smaller down payment of around 3.5% and a lower credit score (even as low as 600). Oftentimes you’re able to borrow more than other loan programs depending on what the home will appraise for upon completion. These loans can be a pain though, requiring detailed scheduling from the contractor that goes beyond the normal scope of things. 

Keep in mind, this is just a shortlist of the loan options you have for your ADU financing. While less conventional, you could always take on a personal loan or even use credit cards if you have the available limits for such a project. 


WHO WILL FINANCE AN ADU LOAN FOR MY CALHFA GRANT?

Once you decide on which loan type you want to take out, it’s time to find a lender. Not all lenders offer ADU loan programs, especially ones familiar with the CalFHA grant. Even so, there’s enough to give you the choices you need. For an exhaustive list of these lenders by county, you can use CalHFA’s approved lender search tool. Here’s some of the approved lender to get you started:

  • Envoy Mortgage
  • Supreme Lending
  • Platinum Home Mortgage
  • New American Funding
  • Loandepot.com

Always check with your current lender to determine if they offer ADU loans. While several of the lenders mentioned above are larger companies, it’s worth looking into local lenders and any incentives they may offer within. 


STEPS IN BUILDING YOUR ADU USING CALHFA’S GRANT

Grant process aside, the steps of actually building your ADU has its own procedures. While it’s an intricate project with no lack of moving parts, the steps below give you a birds eye view of the operation.

1. Acquire Contractor: One of the most important decisions you’ll make in the ADU build process is your choice in contractor. It’s important to pick someone who is known for meeting deadlines and who communicates well. Be sure they’re licensed and insured and someone who specializes in or is at least familiar with the ADU building process. Price is always on consideration as well. To ensure you’re not being taken advantage of, try getting multiple bids on the project for comparison purposes. 

2. Financial Review: Explained in detail in the “How Do I Apply” section above, you’ll find the steps you need to take in order to receive the CalHFA funding and how that fits into your loan. That aside, you’ll want to review your contractor’s bid, decide which financing option best fits your needs, and discuss adjusting your design if need be based on your project’s total cost. 

3. Feasibility Study: This study is a crucial part of the build process as it ensures your build is doable given the utilities from the main house, available lot space, local requirements, and the like. Ensuring that your space is viable for the project and meets building code will save you a huge headache in the end, avoiding possible pitfalls that are identified in the study itself. 

4. City Consult & Permitting: If all is well with the feasibility study, your contractor can now submit a complete set of drawings to the city. Alongside these drawings, they’ll begin working on the permitting needed for everything. Pulling these permits allows the work to be done legally and safely for all involved.

5. Finalize Aesthetics: Probably the most fun step in the process is finalizing the materials used in your ADU build. Most people already have an idea of how they’d like their ADU to look both inside and out. If not, their contractor can supply them with 3D mock ups and material options from siding to flooring.

6. Construction Begins: Finally, with all the nitty gritty details pegged down, your build out can officially begin! Completion times vary depending upon how big or small your project is and what customizations are being added. You can usually expect a build from beginning to end to take anywhere from 7 to 16 months. 


CONCLUSION

An accessory dwelling unit can serve many purposes that are beneficial for expanding families, guests and the like. Even so, it’s no secret that finances can pose an obstacle in making this dream a reality. That’s why the CalHFA California ADU grant program is worth investigating. This grant program takes the sting off the bottom line, offering a more affordable project with the extra space many families want or even need.


Thursday, January 5, 2023

BATHTUB TO SHOWER CONVERSION: 5 INSPIRED IDEAS FOR YOUR BATHROOM REMODEL


A bathtub to shower conversion has the power to transform your bathroom. Offering a space-saving aspect, both real and perceived, it can open up even the smallest of bathrooms. Not to mention a seamless look with safety and maintenance features to boot, it’s a game changer. So if you’re thinking of making the switch and need some inspiration for the final product, you’re in the right place!


WHY MAKE THE BATHTUB TO SHOWER CONVERSION?

You may be wondering if a bathtub to shower conversion is worth it. After all, it’s no small undertaking, especially when most homeowners opt to do a complete renovation alongside a tub to shower conversion. Even so, more than enough reasons make this project a worthy investment. Check out the five significant advantages below that are sure to prove that bath to shower conversions are worthwhile.

·         Safety: For starters, showers are generally safer than bathtubs. They’re also easier to get in and out of, especially for the elderly. The ability to make a short step in and out causes fewer accidental falls than stepping over the lip of a tub. Also, the addition of safety bars, shower seats, and wheelchair accessibility make them an option that grows with you. 


·            Conservation: It’s no secret that tubs take a large amount of water to fill. Along with the amount is the fill time. Between the water, energy, and time to fill the tub, you’ve left quite a footprint. That quickly makes the bathtub to shower conversion the more environmentally friendly choice. 


·         Space: Tubs take up more of the bathroom while offering less usable bathing space. Showers can create more expansive walking space, a more open feel, and a far larger bathing area. You’ll be shocked at how much more space a conversion provides, even with a bigger shower install. 


·         Health: While it’s true baths have some excellent health benefits, and it’s not the best option for overall skin health. Baths can strip your skin of the natural, protective oils it produces. With light pressure, showers provide necessary hygiene without soaking off essential skin nutrients. 


·         Style: Last but not least, removing a tub gives a bathroom an attractive, modern feel. Gone are the days of garden tubs and shower, tub combinations. A sizable shower is most desirable and stylish. 

All things considered, showers have some serious advantages over the traditional bathtub. Still not convinced? Maybe these tub to shower conversion before and after photos will do the trick! Ready to take your builder-grade bathroom to a customized oasis? Check out our finished projects to help get you started with tub to shower conversion ideas. Let’s jump right in!


1.   Tub to Rolling Frameless Shower


A rolling frameless door is an excellent solution for making an update in a small space. The door’s ability to roll on a mounted track above means no swinging door taking up valuable space. Not only is it functional, but it’s also a modern touch with plenty of styles. For example, in the bathtub to shower conversion above, the elimination of the tub created more space around the commode and a larger bathing area altogether. 

This bathroom remodel to shower shows the beauty of a frameless door system. The beautiful patterned tile work can shine without a curtain or frame getting in its way. A rich, earthy color scheme incorporated throughout makes for a warm and cohesive finished product.

2.   Tub to Hinged Frameless Shower 


Though the hinged system forces the door to swing into the bathroom, it’s well worth the conversion. While a frameless transformation is featured in the bathroom above, there’s also a framed option for hinged systems. Likewise, hinged doors can function as a single door, as seen in the bathtub to shower conversion above, or a dual system with hinges on both sides. No matter your choice, hinged systems are far easier to move in and out than a tub setup. 

In this bathtub converted to walk in shower, the black fixtures bring the bathroom up to speed, flowing with the other dark touches in the shower’s tile work. An even split of light and dark, the walls, countertops, and wood additions even out the palette leaving a fresh and sleek design.

3.   Tub to Semi-Frameless Shower 


Semi-frameless enclosures are the best of both worlds. You can rest assured of its integrity by providing extra stability on the framed edges. Simultaneously, leaving other edges with the much-desired clean glass corners gives your shower a seamless finish. The semi-frameless shower stall above makes use of the space more efficiently, offering double the bathing space without the clunky tub.

In terms of style, this bathtub remodel to shower takes a significant turn from basic to luxurious. Dark neutrals are traded for cool tones coupled with varied wood grains that, combined, make for an unbelievable overhaul. 

4.   Tub to Pivot Frameless Shower 


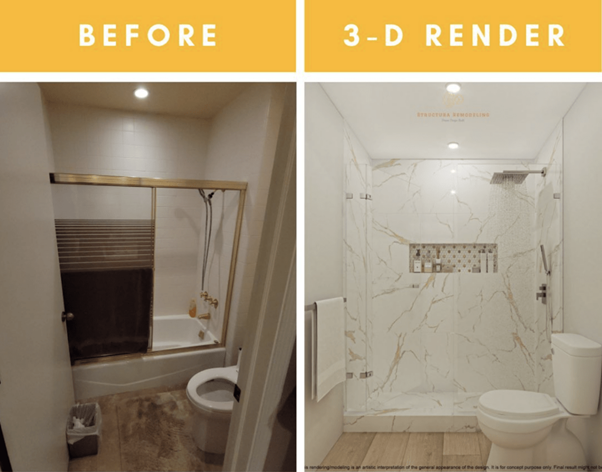
Often confused with hinged doors, pivot doors have their unique advantage. Pivot doors can swing both in and out, providing options based on your bathroom configuration. In addition, the replacement of the tub with a step-up shower creates a much safer bathing environment as well. Given that the tub above posed even more dangers as it included an enclosure, this bathtub to shower conversion has dramatically reduced the risk of accidents. 

Proof that you don’t have to sacrifice style for safety, this bathtub converted to walk in shower boasts beautiful marble shower walls and flooring. Accompanied by upgraded fixtures like the rain shower head and built-in storage, it’s a significant step up from the tub it once was. 

5.   Tub Enclosure to Swinging Frameless Tub


While this bathtub to shower remodel above doesn’t eliminate the tub completely, it converts it into a much more user-friendly space. This is a viable option if you’re not ready to part ways with your tub but still want a modern, updated look. The frameless hinged door eliminates the hazards of an old enclosure while still giving its users whichever bathing method they prefer. 

Though this wasn’t a complete bathtub to shower conversion as the tub wasn’t fully converted, it was swapped out for a deeper, more contemporary model. Adding a colorful, full wall tile paired with solid neutrals offers a welcomed contrast with a balanced simplicity.

Finally, we need to know how much the cost of conversion of bathtub to shower, as well as small bathroom remodeling costs in California.


Monday, January 2, 2023

HOW TO AVOID MAKING INTERIOR DESIGN MISTAKES- BE SMART ABOUT THE TRENDS


One thing that keeps Interior remodeling Companies in Los Angeles very busy is redesigning our DYI project mistakes, our obsession with design trends that turn into design trends faux pas, and trends that last for only a season or two.

Just like high fashion, where elegant styles are timeless and can be worn and appreciated for many years, we can have a high-end, sleek home design with a fresh and timeless style we can enjoy for years—for example, an all-white marble tile bathroom.  You will never get tired of that classic look. If you want to change it up a bit, change the accessories, but the bones are solid.

On the other hand, think of fashion trends that flamed out in a season, and you would never be caught dead wearing again. For example, long-sleeved shirts with a bustier top over them or animal print everything!!!

Will we ever forgive ourselves for shag carpets and plastic-covered furniture?!!!

HERE ARE A FEW INSIGHTS AND LESSONS FROM SOME OF OUR FAVORITE INTERIOR REMODELING COMPANIES IN LOS ANGELES ON HOW TO AVOID MAKING THOSE MISTAKES IN THE FUTURE.


THE SECRET TO GOOD INTERIOR DESIGN- HOW TO STAY CLASSY AND LOOK TRENDY

·         Use quality design materials as the foundation.

·         Save the trends for things that are easily changed or replaceable.

·         When you get bored or the design world has moved on, you can quickly move on by changing paint colors and accessories without tearing down walls or replacing fixtures.


DON’T OVERUSE A DESIGN ELEMENT.

Have you heard the expression “too much of a good thing”? Apply that to design as well. Just because you love mid-century modern doesn’t mean that every single piece in your house should be from the ’50s or the ’60s.  Don’t listen to your mother, the curtains, carpet, walls, and furniture do not need to be the same color. It’s like wearing all denim. You know better!!!


FORGET YOU EVER LEARNED THE WORD “SHIPLAP.”

Tale the truth!!! Before Chip and Joanna Gains started renovating all of Texas with reclaimed Shiplap, had you ever heard of this wood before. Did you crave it? Did you dream about rooms in your house covered in reclaimed Shiplap? Since the Gains started promoting Shiplap on their show, there has been a 150% increase in the demand for this reclaimed wood.

Shiplap was not used for ships, as the name implies. It was primarily used for barns and sheds as inexpensive weatherproofing. The trend is now reversing as people tire of the dark wood. I think they finally realize it needs to go the way of the 50’s knotty pine paneling used in every finished basement and family room of that decade.  If you are still set on Shiplap, use discretion.   How about behind the television or an accent wall? According to Joanna Gains, it looks excellent painted a dark color.


MID – CENTURY MODERN MANIA

Interior remodeling companies in Los Angeles are overrun with requests to renovate Mid- Century Modern Homes. Los Angeles County has many great examples of the 50’s architectural style. Some have been perfectly preserved or renovated to preserve the integrity of the design. Design features like the unique window shapes, flat roofs, asymmetrical shapes, open floor plans, and the way the homes connect to the outdoor space and nature are very appealing.

We can celebrate the beauty of the design and brilliant architecture, but do you have to decorate with all things 50’s. This is the same interior design mistake that people make when they fall in love with a style or concept. If you appreciate antiques, does that mean your home has to be filled with antiques only? Have we not made anything of use or aesthetically appealing in the last two hundred plus years? I’m sorry, but those antique couches are not made to be sat on by twenty-first-century bodies. We are used to being comfortable, and we should have it.

To appreciate the design aesthetic we are better off highlighting it with a few fantastic pieces instead of having people feel like they are entering a museum when they come to visit.


CHALK BOARD PAINT

Every DYI starting in 2016 show demonstrated how to organize your life by having a chalkboard painted wall. You could keep your grocery list up to date, track carpool schedules, or create that tavern, pub environment right in your own home. Use it to organize your office space or give the kids a wall to draw on in their rooms.   It turns out that it’s a lot harder than it looks to get that perfect chalkboard surface, and people actually don’t want their homes to look like a tavern. Interior remodeling companies in Los Angeles recommend updated technology- whiteboard wallpaper walls. Easier to apply and less messy. No soft chalk dust anywhere.


WALLPAPER IS BACK IN STYLE

Wallpaper is back in fashion, but not how we think about it remembering our grandmother’s house back in the day. We are not going back to complicated floral patterns in every room of the house. Think accent wall—a bold graphic print on a wall to break up a large room or highlight a specific space.

Again, technology has brought up some excellent decorating opportunities, offering temporary wallpaper. This is a boon to apartment renters. And just like a henna tattoo, when you get tired, you can remove it for those who are commitment-phobic.


CONCRETE COUNTER TOPS

Concrete Counter Tops were trendy, with the HGTV Design Show starting about 2016. Concrete does have a great industrial look and offers some creative design options. The problem is that once you pour it, you can’t change your mind. The only way to remove it is with a jackhammer. It’s heavy and porous.  If not properly sealed and maintained, your countertops will stain.  Interior remodeling companies in Los Angeles say their clients are really done with concrete counters.


ON TREND FOR 2023

Now that you know how to avoid critical interior design mistakes, it’s time to plan for your 2023 design projects. Work with a company that can keep your project on track, save you from the common DYI mistakes and deliver professional results. This is an investment in your home.  When it comes to interior renovation projects like bathroom, kitchen, office, or home additions, you want to work with the top Interior remodeling company in Los Angeles.

When you work with best interior remodelling companies in Los Angeles, at the same time, you also need some home interior designers in Los Angeles for the plan of home renovation project in 2023.


Friday, December 30, 2022

BATHTUB TO SHOWER CONVERSION: 5 INSPIRED IDEAS FOR YOUR BATHROOM REMODEL


A bathtub to shower conversion has the power to transform your bathroom. Offering a space-saving aspect, both real and perceived, it can open up even the smallest of bathrooms. Not to mention a seamless look with safety and maintenance features to boot, it’s a game changer. So if you’re thinking of making the switch and need some inspiration for the final product, you’re in the right place!


WHY MAKE THE BATHTUB TO SHOWER CONVERSION?

You may be wondering if a bathtub to shower conversion is worth it. After all, it’s no small undertaking, especially when most homeowners opt to do a complete renovation alongside a tub to shower conversion. Even so, more than enough reasons make this project a worthy investment. Check out the five significant advantages below that are sure to prove that bath to shower conversions are worthwhile.

·         Safety: For starters, showers are generally safer than bathtubs. They’re also easier to get in and out of, especially for the elderly. The ability to make a short step in and out causes fewer accidental falls than stepping over the lip of a tub. Also, the addition of safety bars, shower seats, and wheelchair accessibility make them an option that grows with you. 


·         Conservation: It’s no secret that tubs take a large amount of water to fill. Along with the amount is the fill time. Between the water, energy, and time to fill the tub, you’ve left quite a footprint. That quickly makes the bathtub to shower conversion the more environmentally friendly choice. 


·         Space: Tubs take up more of the bathroom while offering less usable bathing space. Showers can create more expansive walking space, a more open feel, and a far larger bathing area. You’ll be shocked at how much more space a conversion provides, even with a bigger shower install. 


·         Health: While it’s true baths have some excellent health benefits, and it’s not the best option for overall skin health. Baths can strip your skin of the natural, protective oils it produces. With light pressure, showers provide necessary hygiene without soaking off essential skin nutrients. 


·         Style: Last but not least, removing a tub gives a bathroom an attractive, modern feel. Gone are the days of garden tubs and shower, tub combinations. A sizable shower is most desirable and stylish. 

All things considered, showers have some serious advantages over the traditional bathtub. Still not convinced? Maybe these tub to shower conversion before and after photos will do the trick! Ready to take your builder-grade bathroom to a customized oasis? Check out our finished projects to help get you started with tub to shower conversion ideas. Let’s jump right in!


1. Tub to Rolling Frameless Shower


A rolling frameless door is an excellent solution for making an update in a small space. The door’s ability to roll on a mounted track above means no swinging door taking up valuable space. Not only is it functional, but it’s also a modern touch with plenty of styles. For example, in the bathtub to shower conversion above, the elimination of the tub created more space around the commode and a larger bathing area altogether. 

This bathroom remodel to shower shows the beauty of a frameless door system. The beautiful patterned tile work can shine without a curtain or frame getting in its way. A rich, earthy color scheme incorporated throughout makes for a warm and cohesive finished product.

2. Tub to Hinged Frameless Shower 


Though the hinged system forces the door to swing into the bathroom, it’s well worth the conversion. While a frameless transformation is featured in the bathroom above, there’s also a framed option for hinged systems. Likewise, hinged doors can function as a single door, as seen in the bathtub to shower conversion above, or a dual system with hinges on both sides. No matter your choice, hinged systems are far easier to move in and out than a tub setup. 

In this bathtub converted to walk in shower, the black fixtures bring the bathroom up to speed, flowing with the other dark touches in the shower’s tile work. An even split of light and dark, the walls, countertops, and wood additions even out the palette leaving a fresh and sleek design.


3. Tub to Semi-Frameless Shower 


Semi-frameless enclosures are the best of both worlds. You can rest assured of its integrity by providing extra stability on the framed edges. Simultaneously, leaving other edges with the much-desired clean glass corners gives your shower a seamless finish. The semi-frameless shower stall above makes use of the space more efficiently, offering double the bathing space without the clunky tub.

In terms of style, this bathtub remodel to shower takes a significant turn from basic to luxurious. Dark neutrals are traded for cool tones coupled with varied wood grains that, combined, make for an unbelievable overhaul. 


4. Tub to Pivot Frameless Shower 


Often confused with hinged doors, pivot doors have their unique advantage. Pivot doors can swing both in and out, providing options based on your bathroom configuration. In addition, the replacement of the tub with a step-up shower creates a much safer bathing environment as well. Given that the tub above posed even more dangers as it included an enclosure, this bathtub to shower conversion has dramatically reduced the risk of accidents. 

Proof that you don’t have to sacrifice style for safety, this bathtub converted to walk in shower boasts beautiful marble shower walls and flooring. Accompanied by upgraded fixtures like the rain shower head and built-in storage, it’s a significant step up from the tub it once was. 


5. Tub Enclosure to Swinging Frameless Tub


While this bathtub to shower remodel above doesn’t eliminate the tub completely, it converts it into a much more user-friendly space. This is a viable option if you’re not ready to part ways with your tub but still want a modern, updated look. The frameless hinged door eliminates the hazards of an old enclosure while still giving its users whichever bathing method they prefer. 

Though this wasn’t a complete bathtub to shower conversion as the tub wasn’t fully converted, it was swapped out for a deeper, more contemporary model. Adding a colorful, full wall tile paired with solid neutrals offers a welcomed contrast with a balanced simplicity.

So, for a perfect renovation contact a bathroom renovation contractor in Los Angeles.


PROJECT REVEAL: BATHROOM REMODELING IN SANTA MONICA

  Our Client was ready for a bathroom remodeling in Santa Monica . It had gotten to the point where they could no longer use the bathroom. I...